class Thursday, October 25th, 2007
Demonstrate editing techniques - cutting polygons and auto-complete
Add new fields to building layer to store building floors and height
Adding values to attribute tables
Create range domain on floors field (1-5)
Validating range domains
Monday, October 29, 2007
Tuesday, October 16, 2007
More campus ...

Building polylines or polygons? Yeah, you guessed it -polygons. So, how do we go from the CAD polylines to polygons?
A great tool available at the Arc/Info license called Feature to Polygon. Check it out the screen shot.
Another great tool, if you did not have Arc/Info is an extension for the software called XTools Pro.
It has a lot of great free functionality but if you plan to use it past the evaluation period you'll need to buy it. This extension has all kinds of feature conversions, table operations, layer operations and more. Check it out!
Monday, October 15, 2007
Utilize the feature class created from CAD import to parsing out individual layers
Last class, we imported a CAD polyline feature class of the campus to a single feature class in our campus geodatabase. We also georeferenced this new feature class to real-world coordinates using the Spatial Adjust toolbar.
This new feature class had many different features of the campus like buildings, sidewalks, utility poles and other important data. These features can delineated based on the 'layer' they were on in the CAD file. This information is brought over to the GIS in a field called 'layer'.
This class, we will use the georeferenced data that we imported from CAD to a single feature class to parse out into individual features classes.
HOW?
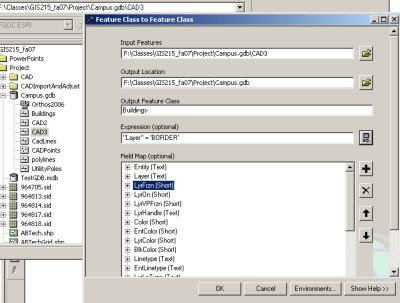
Utilize ArcCatalog to EXPORT layers. During the export using the query tool to select a subset of features to be exported to the new feature class. This will allow you to segregate features from individual CAD layer and export them to feature classes.
You should end up with individual feature classes in your geodatabase for buildings, sidewalks, utility poles, etc...
See graphic below for an example of how the dialog box should look for exporting the features from the buildings layer to a new Buildings feature class in the same geodatabase.
This new feature class had many different features of the campus like buildings, sidewalks, utility poles and other important data. These features can delineated based on the 'layer' they were on in the CAD file. This information is brought over to the GIS in a field called 'layer'.
This class, we will use the georeferenced data that we imported from CAD to a single feature class to parse out into individual features classes.
HOW?
Utilize ArcCatalog to EXPORT layers. During the export using the query tool to select a subset of features to be exported to the new feature class. This will allow you to segregate features from individual CAD layer and export them to feature classes.
You should end up with individual feature classes in your geodatabase for buildings, sidewalks, utility poles, etc...
See graphic below for an example of how the dialog box should look for exporting the features from the buildings layer to a new Buildings feature class in the same geodatabase.

Tuesday, October 2, 2007
Starting the campus geodatabase
This exercise will mark the beginning of our campus geodatabase project. Begin by creating a folder for this project. File management is vital to the success of all GIS projects. Make sure to maintain a logical and consistent file structure for this entire project.
OBJECTIVES:
- Create a file based geodatabase
- Incorporate ABTech main campus parcels into geodatabase
- Create raster catalog of images for ABTech main campus
STEP-BY-STEP:
- In ArcCatalog, create a file based geodatabase to store our project database.
- Open ArcMap and load the parcels layer for the Buncombe County.
- Utilize an attribute query to select the parcels owned by AB Tech. You'll need to be creative when selecting since all the parcels owned by AB Tech are not listed exactly the same attribute table.
- Unselect any parcels that are not part of the main campus.
- Export the selected parcels in to the geodatabase for this project. Name this new feature class something logical.
- Go to the Buncombe County digital data download page and download the 2006 aerial grid. This will be used to determine which images you need for the campus.
- http://www.buncombecounty.org/GOVERNING/depts/GIS/aerialImagery_06.htm - will take you to the download page.
- Unzip the shapefile and add it to ArcMap.
- Utitlize select by location (Selection drop down ==> Select by Location) and select the features in the grid that intersect the AB Tech parcels.
- Export the selected polygons in the grid to the AB Tech geodatabase. Add the new grid layer for the ABTech campus to map document. Open the attribute table and determine the grid numbers for the AB Tech campus.
- Go back to the Buncombe County digital data download page and download the images that go with the campus. Unzip them all into the same directory.
- In ArcCatalog, right-click your geodatabase and create a new Raster Catalog. --Learn more about creating raster catalogs from the ESRI Support Center.
- Type in a name for the new raster catalog.
- Click the Spatial Reference Properties button to choose a coordinate system for the raster catalog. You should import the spatial reference from one of the images you downloaded.
- Choose that you want your raster catalog to be unmanaged by the geodatabase (as opposed to managed).
- Click OK.
- Now you must get the images into your Raster Catalog. In ArcCatalog, drag and drop the images into the raster catalog.
- Add the raster catalog to ArcMap.
Managing CAD data in ArcCatalog
Adding CAD data to ArcMap
Transforming CAD datasets
World Files
Subscribe to:
Posts (Atom)